Next.js Preview Mode allows you to create sharable URLs where you can see preview content rendered on actual pages. Specifically, Next.js provides a Preview Mode feature that allows you to render pages with draft content at request time instead of build time. The Next.js official documentation explains how to implement Preview Mode. However, it does not really explain how Next.js Preview Mode works.
In this tutorial, you will learn how to implement Preview Mode in Next.js and how this works through a code walkthrough based on a real example.
What Is Next.js Preview Mode?
Next.js Preview Mode allows authenticated users to see how draft content would be rendered by the Next.js application. In particular, Preview Mode enables bypassing Next.js Static Generation for this specific case, so you always have access to the latest version of the content. Let’s consider a scenario where you have a statically generated website in Next.js. Since all pages are rendered at build time, you have to rebuild your Next.js application to see new content. Thanks to Next.js Preview Mode, you can avoid all this.
In detail, with Preview Mode you can bypass a statically prerendered page and render that page on-demand only for authorized users. This means that you can provide some users with the ability to see new, draft, updated content on a particular page, without having to perform a deploy. In other terms, Next.js Preview Mode equips you with everything you need to implement the content preview feature offered by monolithic CMSs such as WordPress.
You can take advantage of this feature in several scenarios. Specifically, Next.js Preview Mode is incredibly useful for content editors. This is because you can give them the ability to view real-time draft content edited with their headless CMS directly on the actual pages. Note that these draft content pages should only be available to a limited group of members of your team, ideally through a shareable URL. This is exactly what Next.js Preview mode allows you to achieve.
How Does Next.js Preview Mode Work?
As explained on the Next.js Preview Mode page of the official documentation, Preview Mode is intended to work with a headless CMS. So, to understand how Next.js Preview Mode works, let’s take a look at DatoCMS’s Next.js blog starter. If you are not familiar with this project, this is nothing more than a simple blog template implemented with Next.js and DatoCMS. Check out the live blog demo.

This project implements the Preview Mode feature in Next.js. Specifically, it provides access to preview mode with a single click.
Let’s understand how to achieve this and dig into how Next.js Preview mode works. To follow this tutorial more easily, you should keep the GitHub repository of the Next.js blog template open in a new tab. Review it periodically to keep up and understand how the code works as a whole.
Step #1: Creating a preview API route
To enable Preview Mode, you need to create a preview API route. Keep in mind that Next.js allows you to build APIs. Specifically, any file inside the pages/api folder is mapped to /api/* and is treated by Next.js as an API endpoint. This is what a basic Next.js API looks like:
export default function handler(req, res) { // the "/api/hello-world" page will return // "Hello, World!" res.status(200).json("Hello, World!")}To define a proper Next.js API route, you need to export a function as default. This function receives the following two parameters:
req: An instance of thehttp.IncomingMessageres:An instance of thehttp.ServerResponseNode.js class.
These two parameters handle the HTTP request and the HTTP response associated with the API, respectively.
Note that your preview API route file can have any name, but is typically defined in pages/api/preview.js. In this API route, you need to call the Next.js setPreviewData() function on the res object. setPreviewData() accepts an object as a parameter. This object will then be passed to getStaticProps(), but you learn more about this later on. For now, let’s consider a simple empty object {} as the setPreviewData()argument.
This is what a basic pages/api/preview.js file looks like:
export default (req, res) => { // ...
res.setPreviewData({});
// ...
// redirecting to the home page res.redirect("/");}
What res.setPreviewData({}) does is set two cookies on the browser. These will turn on Next.js Preview Mode. Any requests to your Next.js website containing these two cookies will activate the preview mode logic.
Enter preview mode in the DatoCMS Next.js blog live demo and see what happens in the Application > Cookie section of your browser's developer tool.
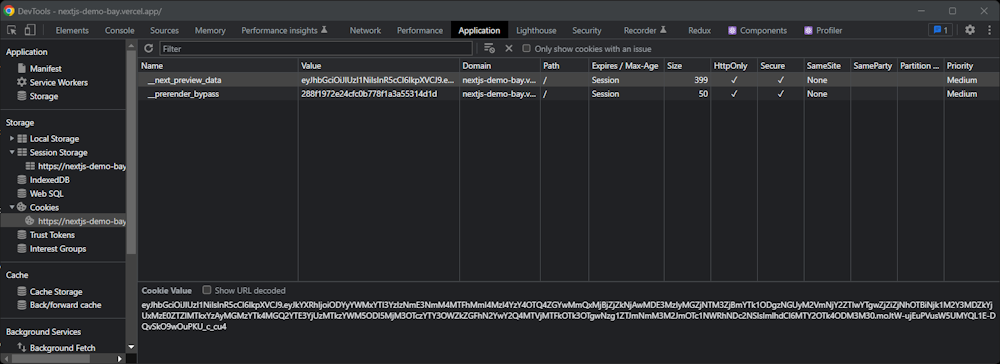
As you can see, setPreviewData() set the following two HttpOnly secure cookies:
__next_preview_data__prerender_bypass
Finally, the res.redirect() function redirects the users to the home page by sending an HTTP 302 response. From this point on, users are navigating the website in preview mode. So, they can access pages with preview content through their preview URLs. Since only a limited set of users should be able to see this content, you need to protect your preview mode.
Step #2. Protecting Next.js preview mode with a secret
You now need a secret token string. You can generate it with any online token generator. This secret ensures confidentiality because it prevents people who do not know the secret from accessing preview URLs.
In the Next.js blog template, you can store this secret in the NEXT_EXAMPLE_CMS_DATOCMS_PREVIEW_SECRET env. Only the members of your team should know this secret.
Let’s now check out the pages/api/preview.js file of the DatoCMS Next.js blog template:
export default async (req, res) => { // Please set the NEXT_EXAMPLE_CMS_DATOCMS_PREVIEW_SECRET env variable // on Vercel/Netlify, or everyone will be able to enter Preview Mode and // see draft content!
const secret = process.env.NEXT_EXAMPLE_CMS_DATOCMS_PREVIEW_SECRET;
// Check the secret and next parameters if (secret && req.query.secret !== secret) { return res .status(401) .json({ message: 'Missing or invalid `secret` query string parameter!' }); }
// Enable Preview Mode by setting the cookies res.setPreviewData({});
// Redirect to the homepage, or to the URL provided with the `redirect` query // string parameter: const redirectUrl = new URL(req.query.redirect || '/', 'https://example.com');
res.redirect(`${redirectUrl.pathname}${redirectUrl.search}`);};The preview API route read the secret string from the NEXT_EXAMPLE_CMS_DATOCMS_PREVIEW_SECRET environment variable and checks it against the secret query parameter. If the secret stored in the matches the string stored in the secret query param:
setPreviewData()is called,preview mode is successfully activated,
the user is redirected to the home page.
Otherwise, an HTTP 401 Unauthorized error is returned.
In other terms, if you want to enter preview mode, you first have to visit:
https://<your-website>/api/preview?secret=<secret-token-string>Where <secret-token-string> must match the secret token string stored in the NEXT_EXAMPLE_CMS_DATOCMS_PREVIEW_SECRET env.
If you look at the link to activate preview mode in the Blog template live demo, you will note that it does not involve any secrets.
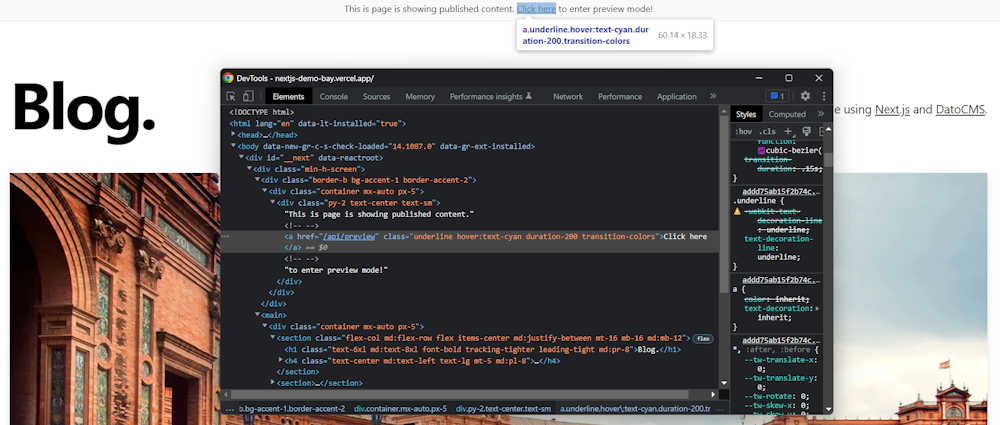
In detail, the complete URL to access preview mode is:
https://nextjs-demo-bay.vercel.app/api/previewThis was done to provide visitors with a fancy link involving no secrets to access the preview mode. Specifically, NEXT_EXAMPLE_CMS_DATOCMS_PREVIEW_SECRET was left empty. In a demo application, this is okay. In a real-world scenario, you should never do this. Otherwise, everyone will be able to access preview mode by simply visiting /api/preview!
Step #3: Update getStaticProps() Logic
You now have to update getStaticProps() functions to handle preview mode on all pages that support preview content. When you access a page that uses getStaticProps() with the preview mode cookies set, Next.js calls getStaticProps() at request time. Normally, it would only call this function at build time or from time to time in case of ISR (Incremental Static Regeneration).
This means that in preview mode, you always have access to the latest version of the content. In technical terms, Next.js will perform SSR (Server-Side Rendering) on preview pages. Or in other words, getStaticProps() will behave like getServerSideProps(). This is especially useful because preview content is likely to be updated often. And users should always see the latest version of the content.
When preview mode is activated, the getStaticProps() context parameter object will also contain the following two variables:
preview: A boolean set totrue.previewData: An object that contains the data passed as an argument tosetPreviewData().
Let’s see them in action:
// ...
// let's assume preview mode is enabledexport async function getStaticProps(context) {    // ...
    console.log(context.preview) // prints "true"    console.log(context.previewData) // prints "{}"}
Since the argument passed to setPreviewData() in the preview API route was {}, context.previewData will be {}. For example, you can use this variable to pass session information from the preview API route to getStaticProps().
Let’s now have a look at the getStaticProps() function of the pages/posts/[slug].js file of the DatoCMS Next.js blog template. This file contains the implementation of the blog post dynamic web page. By inspecting the getStaticProps() logic, you will understand how to retrieve preview data in DatoCMS. As explained in the official Next.js documentation, you have to change the data retrieval logic based on how your headless CMS handles preview content.
Let’s now learn how to deal with preview content in DatoCMS:
// ...
export async function getStaticProps({ params, preview = false }) { const graphqlRequest = // omitted for brevity...
return { props: { subscription: preview ? { ...graphqlRequest, initialData: await request(graphqlRequest), token: process.env.NEXT_EXAMPLE_CMS_DATOCMS_API_TOKEN, } : { enabled: false, initialData: await request(graphqlRequest), }, preview, }, };}
// Post component ...As you can see, the data retrieval logic changes based on the preview value. Note that preview is assigned to false by default. So, if preview mode is disabled, preview will be false and getStaticProps() will return:
{ enabled: false, initialData: await request(graphqlRequest),}enabled contains information regarding the status of the preview mode, while initialData stores data from a specific blog post retrieved with a GraphQL query through the DatoCMS Content Delivery API.
On the other hand, if preview mode is enabled, preview will be true and getStaticProps() will return:
{ ...graphqlRequest, initialData: await request(graphqlRequest), token: process.env.NEXT_EXAMPLE_CMS_DATOCMS_API_TOKEN,}This data will then be fed to the useQuerySubscription() hook in used in the React.js Post component:
import Head from "next/head";import { renderMetaTags, useQuerySubscription } from "react-datocms";import Container from "@/components/container";import Header from "@/components/header";import Layout from "@/components/layout";import MoreStories from "@/components/more-stories";import PostBody from "@/components/post-body";import PostHeader from "@/components/post-header";import SectionSeparator from "@/components/section-separator";import { request } from "@/lib/datocms";import { metaTagsFragment, responsiveImageFragment } from "@/lib/fragments";
// getStaticProps() ...
export default function Post({ subscription, preview }) { const { data: { site, post, morePosts }, } = useQuerySubscription(subscription);
const metaTags = post.seo.concat(site.favicon);
return ( <Layout preview={preview}> <Head>{renderMetaTags(metaTags)}</Head> <Container> <Header /> <article> <PostHeader title={post.title} coverImage={post.coverImage} date={post.date} author={post.author} /> <PostBody content={post.content} /> </article> <SectionSeparator /> {morePosts.length > 0 && <MoreStories posts={morePosts} />} </Container> </Layout> );}In detail, DatoCMS offers real-time updates directly in the browser through the useQuerySubscription() hook exposed by react-datocms. This uses the DatoCMS Real-Time Update API to instantly refresh content as soon as it gets saved into DatoCMS, without having to manually reloading the page. Learn more about how to get real-time draft previews with Next.js and DatoCMS.
To make useQuerySubscription() work, you have to pass your DatoCMS Read-Only API token as a parameter. This is created by DatoCMS by default and has access to draft content:
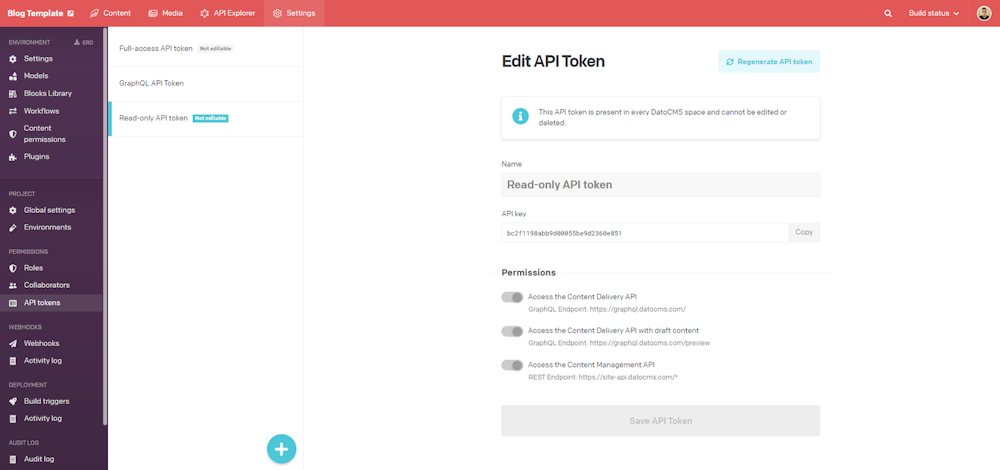
In the DatoCMS Next.js blog template app, this API token key is read from the NEXT_EXAMPLE_CMS_DATOCMS_API_TOKEN environment variable in getStaticProps(). Then it is passed to the frontend through Page props. Note that this token key only provides read access to both publicly accessible content and secret draft content. Specifically, this API token key gets exposed in the frontend only when useQuerySubscription() is called. But this method is called only on draft content, which is shown in pages accessible by a limited set of users. So, this sould not pose security problem.
This is how you can access real-time preview content in DatoCMS, but keep in mind that this is an advanced feature. If you simply want to retrieve preview content directly in getStaticProps(), you can set the includeDrafts flag to true as follows:
await request({ query: graphqlRequest, includeDrafts: context.preview});Then, removes the useQuerySubscription() hook logic in the Page component.
If includeDrafts is true, the DatoCMS Content Delivery API will be called with the HTTP X-Include-Drafts header set to true. This header instructs DatoCMS to return records at the latest available version, rather than the currently published version. In other terms, it gives you access to preview data.
Congrats! You just learned how Next.js Preview Mode works in DatoCMS!
Next.js Preview Mode: FAQ
Let’s now answer some popular questions on Next.js Preview Mode.
When was preview mode added to Next.js?
Next.js introduced Preview Mode in version 9.3. Specifically, Next.js 9.3 was released on March 2020. If you are using an older version of Next.js, follow the official upgrade guide to move to the latest version of Next.js.
Why is Next.js Preview Mode a Secure Solution?
Next.js Preview Mode is a secure solution firstly, because Next.js Preview Mode is enabled by a secret, which is passed as a query parameter to the /api/preview path. Since preview URLs should only be shared with members of your team, only they can know this secret. This ensures the confidentiality of the draft content.
At the same time, what really turns on Preview Mode are the __next_preview_data and __prerender_bypass cookies set by the Next.js setPreviewData() function. So, you might wonder what prevents a malicious user from forging these cookies. If they managed to do so, they would have access to all the draft content. This may represent a serious problem for your company.
Well, the answer is simple. Let's take a look at the __next_preview_data cookie. This is what the cookie contains:
eyJhbGciOiJIUzI1NiIsInR5cCI6IkpXVCJ9.eyJkYXRhIjoiZTU5OGMyNTFlZTdkOTE3NDU2MzRkMDQwNzQ1ZDVmYjE2YzE2MGE4NjZjOWRlOTQyMWU0N2ZkYmZmZGFjYTFmYjE3NmFhMWNhZmY5OWUyY2VjNDU0NmM1N2Q0OTRiNjkwNzg1MDk4NDYzNDZlYjZmNTVhODE4ZWRhNGNmZDM2ZDJiNDE0ODE4MGZkMTljZmVlYWY5MDdhMTU4YTFhNmM3Yjg3YjM1ZjVjNGVhYTU4YjczMGYzZGFiNGE0MTRjNGE4Nzg4NyIsImlhdCI6MTY2OTk5Mzk2OH0.szB_R3QeSsFbaOvoDBFhmpuFr7QnClMuP7ydiRTtoTALet’s copy this content to the jwt.io debugger page:
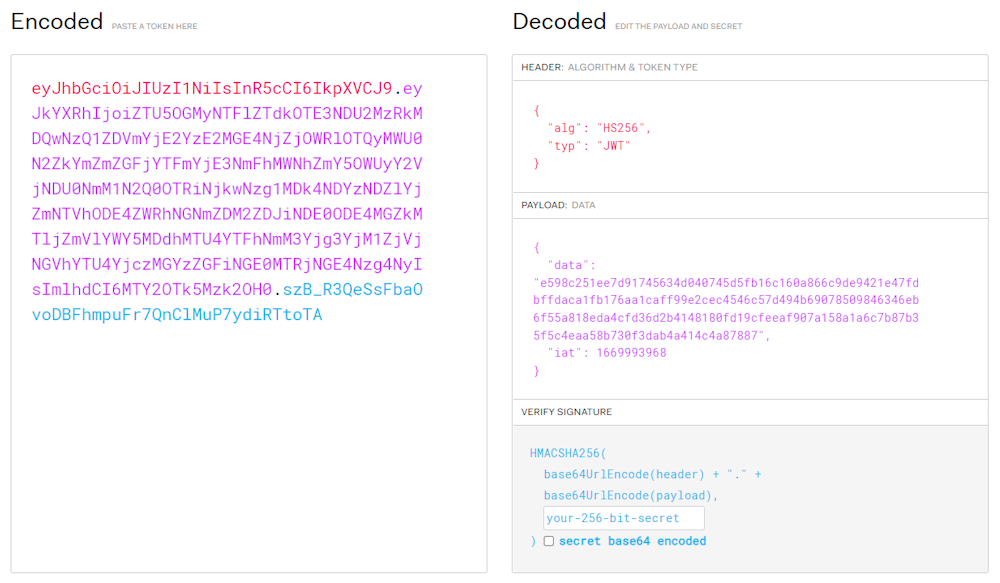
As you can see, __next_preview_data stores a JWT signed with a secret with the HMAC algorithm. If you are not familiar with JWTs, learn more about how signed JWTs work. Since only the Next.js team knows the key used to encrypt these cookies, no one can really forge them. This provides additional security on who can access the preview mode.
Can Next.js Preview Mode depend on the user role?
Yes, it can! All you have to do is define different secrets for different roles. You can figure out the user’s role based on the secret read from the preview URL. Then, pass the user role info to getStaticProps() through setPreviewData(). Finally, change your logic in getStaticProps() based on the user role info read from context.prevewData.
If you are a DatoCMS user, you can create different API tokens with draft content access associated with each role.
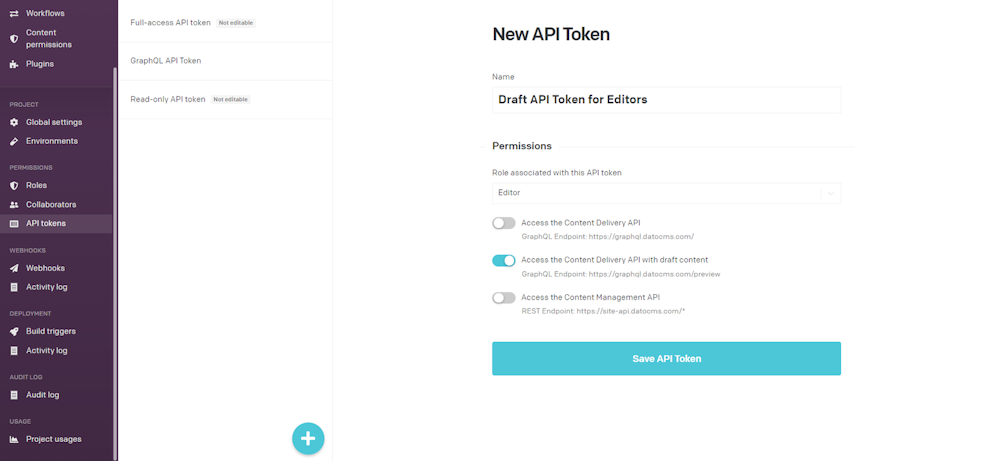
Then, depending on the role of the user, you can use one API token or another to retrieve draft content in getStaticProps().
Conclusion
Preview Mode is a feature introduced in Next.js 9.3 that allows a group of authenticated users to preview content through a simple URL containing a secret. In this article, you learned everything you need to know about Preview Mode in Next.js, from how to implement it to how it works.
In particular, you saw why this feature is so useful, how it works in detail, and why it is a secure solution that guarantees confidentiality. Thanks to a code walkthrough based on a DatoCMS example that uses Next.js Preview Mode, you had the opportunity to learn why it requires three steps and understand how to implement all of them.
Thanks for reading! We hope that you found this article helpful. Feel free to reach out to us on Twitter with any questions, comments, or suggestions.
