AI Translations
Translate fields and records directly on DatoCMS using AI
AI Translations
This plugin integrates with AI providers and provides on-demand AI-powered translations for your fields. You can also translate entire records or perform bulk translations across multiple records and models.
Configuration
On the plugin's Settings screen:
- AI Vendor: Choose your provider — OpenAI (ChatGPT), Google (Gemini), Anthropic (Claude), or DeepL.
- If you chose OpenAI:
- OpenAI API Key: Paste a valid OpenAI key.
- GPT Model: After entering your key, the plugin lists available chat models. Select a model from the dropdown.
- If you chose Google (Gemini):
- Google API Key: Paste a valid key from a GCP project with the Generative Language API enabled.
- Gemini Model: Select a model from the dropdown.
- If you chose Anthropic (Claude):
- Anthropic API Key: Paste a valid Anthropic key.
- Claude Model: Select a model from the dropdown.
- If you chose DeepL:
- DeepL API Key: Paste your DeepL API key.
- Use DeepL Free endpoint: Enable this if your key ends with
:fx(Free plan).
- Prompt Template (AI vendors only): Customize how translations are requested. Use
{fieldValue},{fromLocale},{toLocale}, and{recordContext}. - Translatable Field Types: Pick which field editor types (single_line, markdown, structured_text, etc.) can be translated.
- Translate Whole Record: Enable the sidebar that translates every localized field in a record.
- Translate Bulk Records: Enable bulk translations from table view or via the dedicated page.
- AI Bulk Translations Page: Translate whole models at once.
Key Restrictions and Security
- Keys are stored in plugin settings and used client‑side. Do not share your workspace publicly.
- Prefer restricting keys:
- OpenAI: regular secret key; rotate periodically.
- Google: restrict by HTTP referrer and enable only the Generative Language API.
- The plugin redacts API keys from debug logs automatically.
Models
- OpenAI: the model list is fetched dynamically for your account; the plugin filters out embeddings, audio/whisper/tts, moderation, image, and realtime models.
- Google: the model list is fetched dynamically from the Generative Language API.
Save your changes. The plugin is now ready.
Usage
Field-Level Translations
For each translatable field:
- Click on the field's dropdown menu in the DatoCMS record editor (on the top right of the field)
- Select "Translate to" -> Choose a target locale or "All locales."
- The plugin uses your OpenAI settings to generate a translation.
- The field updates automatically.
You can also pull content from a different locale by choosing "Translate from" to copy and translate that locale's content into your current locale.
Whole-Record Translations
If enabled:
- Open a record that has multiple locales.
- The "DatoGPT Translate" panel appears in the sidebar.
- Select source and target locales, then click "Translate Entire Record."
- All translatable fields get updated with AI translations.
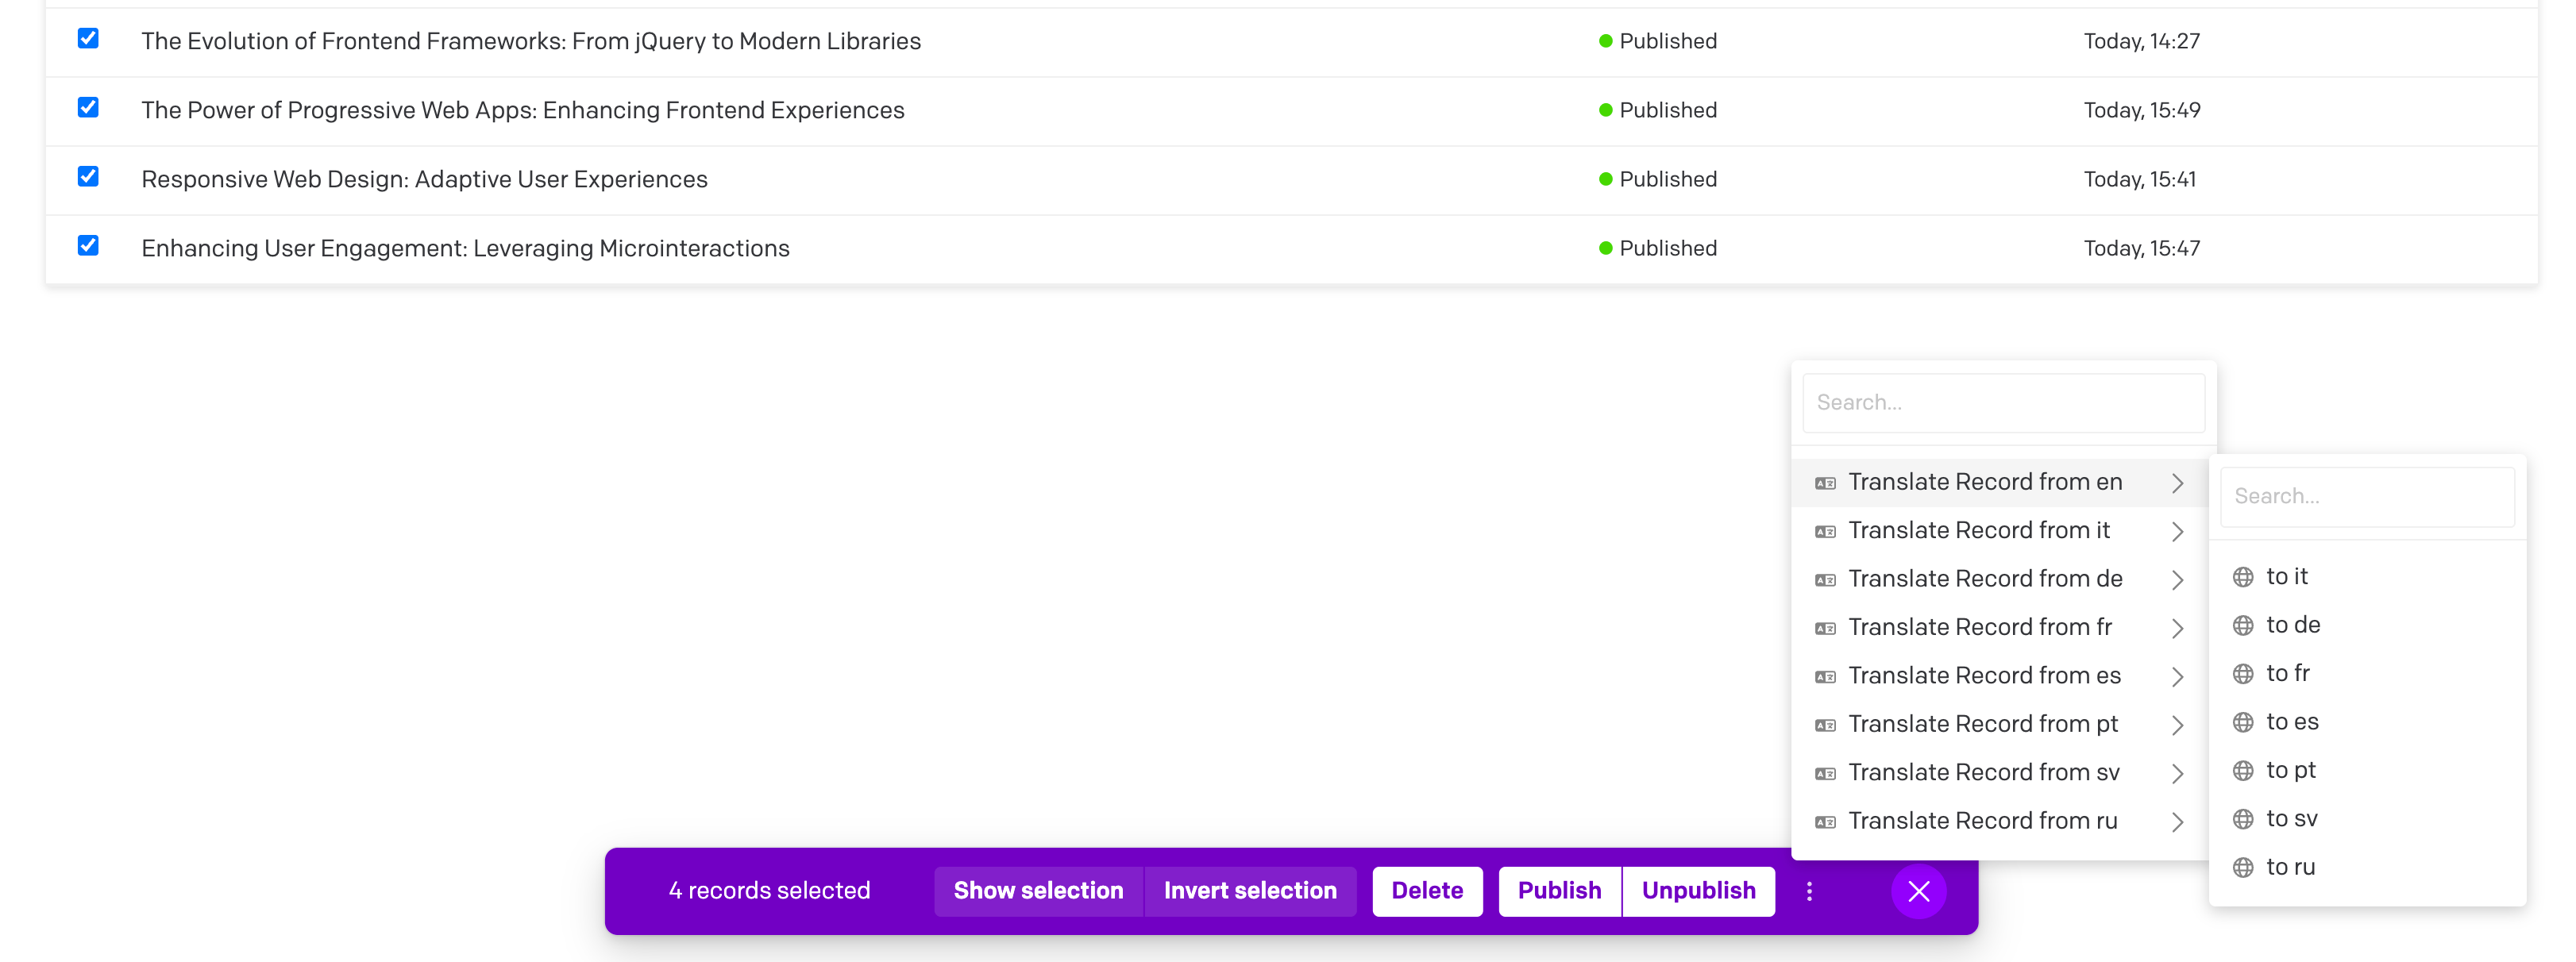
Bulk Translations from Table View
Translate multiple records at once from any table view:
- In the Content area, navigate to any model's table view
- Select multiple records by checking the boxes on the left side
- Click the three dots dropdown in the bar at the bottom (to the right of the bar)
- Choose your source and target languages
- The translation modal will show progress as all selected records are translated
AI Bulk Translations Page
The plugin includes a dedicated page for translating multiple models at once:
- Go to Settings → AI Bulk Translations (in the sidebar)
- Select your source and target languages
- Choose one or more models to translate (block models are excluded)
- Click "Start Bulk Translation"
- The modal will display progress as all records from the selected models are translated
Contextual Translations
The plugin now supports context-aware translations through the {recordContext} placeholder:
- Benefits:
- Better understanding of specialized terminology
- Improved consistency across related fields
- More accurate translations that respect the overall content meaning
- Appropriate tone and style based on context
ICU Message Format Support
The plugin supports ICU Message Format strings, ensuring that complex pluralization and selection logic is preserved during translation.
- Smart Masking: Simple variables like
{name}are masked to protect them, while ICU structures like{count, plural, ...}are passed to the AI. - AI Instructions: The AI is explicitly instructed to preserve the ICU structure and keywords, translating only the human-readable content inside.
Example:
You have {count, plural, one {# message} other {# messages}}Becomes:
Você tem {count, plural, one {# mensagem} other {# mensagens}}Customizing Prompts
You can customize the translation prompt template in the plugin settings:
- Use
{fieldValue}to represent the content to translate - Use
{fromLocale}and{toLocale}to specify languages - Use
{recordContext}to include the automatically generated record context
Excluding Models or Roles
- Models to Exclude: You can specify model API keys that shouldn't be affected by translations.
- Roles to Exclude: Certain roles can be restricted from using or seeing the plugin features.
Troubleshooting
- Invalid API Key: Ensure your key matches the selected vendor and has access.
- Rate Limit/Quota: Reduce concurrency/batch size, switch to a lighter model, or increase your vendor quota.
- Model Not Found: Verify the exact model id exists for your account/region and is spelled correctly.
- Localization: Make sure your project has at least two locales, otherwise translation actions won't appear.
DeepL Glossaries
The plugin supports DeepL glossaries to enforce preferred terminology. You can set a default glossary ID and/or map specific language pairs to specific glossary IDs. This works for all field types, including Structured Text.
Requirements
- A DeepL API key with access to Glossaries. Check your DeepL account/plan capabilities.
- Currently only tested against DeepL v2 glossaries. Use v3 at your own risk (<https://developers.deepl.com/api-reference/glossaries/v2-vs-v3-endpoints>)
Configure DeepL Glossaries in the Plugin
- Open the plugin settings and choose the vendor "DeepL".
- Enter your DeepL API Key and verify it via the "Test API Key" button.
- Expand "Glossary Settings".
- We automatically detect glossaries available to your API key.
- Optional: Set "Default glossary ID" (e.g.,
abc123-efg456-etc) from the available list. This will only apply to translations of this language pairing, and will be ignored otherwise. - Optional: Specify one or more explicit language pairings using the pairing builder:

Resolution Order
When translating from fromLocale → toLocale, the plugin picks a glossary ID using this precedence:
- Exact pair match by your project locales (e.g.,
en-US:pt-BR). - Wildcard any→target (e.g.
*:pt-BR). - Wildcard source→any (e.g.
en:*oren-US:*). - Default glossary ID (if set and applicable).
- Otherwise, no glossary is used.
If DeepL returns a glossary mismatch (e.g., glossary languages don’t match the current pair) or a missing glossary, the plugin automatically retries the same request once without a glossary so your translation continues. A brief hint is surfaced in the UI logs.
Tips and Limitations
- Glossaries apply only to the DeepL vendor. OpenAI/Gemini/Anthropic do not use glossaries.
- The plugin preserves placeholders and HTML tags automatically (
notranslate,ph, etc.). Glossaries will not alter those tokens. This behavior can be configured in the DeepL Tag Settings. - If you set a DeepL "formality" level, it is sent only for targets that support it; otherwise omitted.
- Ensure you test the API key after entering it to catch any potential errors.
Quick Sanity Test
- Create a small EN→DE glossary with an obvious term (e.g., “CTA” → “Call‑to‑Action”).
- In Settings → DeepL, paste the glossary ID into either Default or the
EN->DE=...mapping. - Translate a field from EN to DE containing “CTA”. The resulting German text should include your glossary translation.
Migration Notes
- Existing installations continue to work with OpenAI by default; your current
apiKeyandgptModelremain valid. - To use Google (Gemini):
- In Google Cloud, enable the Generative Language API for your project.
- Create an API key and restrict it by HTTP referrer if possible.
- In the plugin settings, switch vendor to Google (Gemini), paste the key, and select a Gemini model.
- To use Anthropic (Claude):
- Get an API key from the Anthropic Console.
- In the plugin settings, switch vendor to Anthropic (Claude), paste the key, and select a Claude model.
- To use DeepL:
- Get an API key from your DeepL account (Pro or Free).
- In the plugin settings, switch vendor to DeepL and paste the key.
- If using a Free key (ends with
:fx), enable "Use DeepL Free endpoint".
License
This project is licensed under the MIT License - see the LICENSE file for details.