When viewing a collection of items, the records will normally show their title and possibly an image preview (as defined in the model's presentation settings). In this example, the record previews come from the record's Name field:
But sometimes you may want more advanced control over the presentation of your collections. For example, you might want to make the title dynamically change based on another field in the record or an external API query.
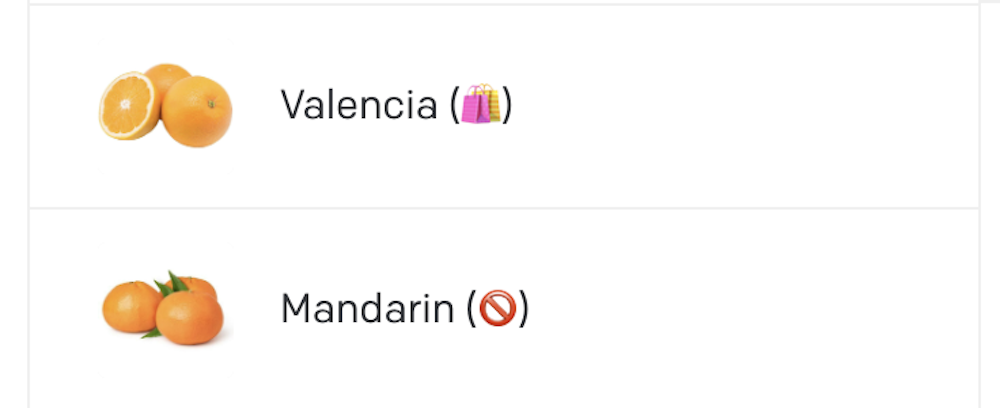
Basic Example: Data from another field
Maybe you want to show an emoji next to the product name based on its product type:
This change is purely cosmetic & superficial, affecting only what your editors see in the collection. It does NOT change the actual data in the record, only its presentation inside the DatoCMS UI.
This level of flexibility empowers you to create a unique and tailored user experience that aligns with your goals.
The buildItemPresentationInfo hook can be used in numerous ways. For example, you can:
Combine multiple fields to present a record
Generate a preview image on the fly
Perform asynchronous API requests to third parties to compose the presentation
These are just a few examples of what you can do with the buildItemPresentationInfo hook. The possibilities are limitless, and you can use this hook to create the exact presentation you need.
The buildItemPresentationInfo hook is called every time a record needs to be presented, and it can return an object with title and/or imageUrl attributes, or undefined, if the plugin does not want to interfere with the default presentation at all.
imageUrl can also be a Data URL
While the imageUrl attribute normally is a normal URL starting with https://, you can also pass a Data URL. Data URLs can be useful to generate an image on-the-fly in JavaScript (for example, using canvases).
Advanced Example: Data from an async fetch
Suppose that one of the models in a DatoCMS project is used to represent products in a ecommerce frontend, and that each product record in DatoCMS is linked to a particular Shopify product via its handle.
Shopify holds information like inventory availability, prices and variant images. We don't want to replicate the same information in DatoCMS, but it would be nice to show them inside the DatoCMS interface.
Since the buildItemPresentationInfo hook can be an async function, we can make a fetch call to the Shopify Storefront API (or any other API) and use its response in our collection display.
We'll modify our previous example to show use the result of this fetch instead, based on a new field shopify_product_handle (which holds an external ID) and a fake function fetchShopifyProduct() (simulating an external fetch):
1
// Updated schema
2
type ProductRecord = Item &{
3
attributes:{
4
name:'string'
5
shopify_product_handle:string// A new required field
6
// product_type?: 'apple' | 'orange' // No longer needed in the modified example
The above is a simplified example using a fake fetch function. In a real project, to perform the actual API call to Shopify, we would need to implement a real fetch function using a real API token and the Shopify store domain. Both can be specified by the final user by adding some settings to the plugin.
A more realistic fetchShopifyProduct function might be something like this:
Use this function to customize the presentation of a record in records
collections and "Single link" or "Multiple links" field.
Return value
The function must return: MaybePromise<ItemPresentationInfo | undefined>.
Context object
The following properties and methods are available in the ctx argument:
Properties and methods available in every hook
Every hook available in the Plugin SDK shares the same minumum set of properties and
methods.
Authentication properties
Information about the current user using the CMS.
ctx.currentUser: User | SsoUser | Account | Organization The current DatoCMS user. It can either be the owner or one of the
collaborators (regular or SSO).
The current DatoCMS user. It can either be the owner or one of the
collaborators (regular or SSO).
ctx.currentUserAccessToken: string | undefined The access token to perform API calls on behalf of the current user. Only
available if currentUserAccessToken additional permission is granted.
The access token to perform API calls on behalf of the current user. Only
available if currentUserAccessToken additional permission is granted.
These methods can be used to open custom dialogs/confirmation panels.
ctx.openModal(modal: Modal) => Promise<unknown> Opens a custom modal. Returns a promise resolved with what the modal itself
returns calling the resolve() function.
Opens a custom modal. Returns a promise resolved with what the modal itself
returns calling the resolve() function.
ctx.openConfirm(options: ConfirmOptions) => Promise<unknown> Opens a UI-consistent confirmation dialog. Returns a promise resolved with
the value of the choice made by the user.
Opens a UI-consistent confirmation dialog. Returns a promise resolved with
the value of the choice made by the user.
'Lorem Ipsum is simply dummy text of the printing and typesetting industry',
5
choices: [
6
{
7
label:'Positive',
8
value:'positive',
9
intent:'positive',
10
},
11
{
12
label:'Negative',
13
value:'negative',
14
intent:'negative',
15
},
16
],
17
cancel:{
18
label:'Cancel',
19
value:false,
20
},
21
});
22
23
if (result) {
24
ctx.notice(`Success! ${result}`);
25
}else{
26
ctx.alert('Cancelled!');
27
}
Entity repos properties
These properties provide access to "entity repos", that is, the collection of
resources of a particular type that have been loaded by the CMS up to this
moment. The entity repos are objects, indexed by the ID of the entity itself.
ctx.itemTypes: Partial<Record<string, ItemType>> All the models of the current DatoCMS project, indexed by ID.
All the models of the current DatoCMS project, indexed by ID.
ctx.fields: Partial<Record<string, Field>> All the fields currently loaded for the current DatoCMS project, indexed by
ID. If some fields you need are not present, use the loadItemTypeFields
function to load them.
All the fields currently loaded for the current DatoCMS project, indexed by
ID. If some fields you need are not present, use the loadItemTypeFields
function to load them.
ctx.fieldsets: Partial<Record<string, Fieldset>> All the fieldsets currently loaded for the current DatoCMS project, indexed
by ID. If some fields you need are not present, use the
loadItemTypeFieldsets function to load them.
All the fieldsets currently loaded for the current DatoCMS project, indexed
by ID. If some fields you need are not present, use the
loadItemTypeFieldsets function to load them.
ctx.users: Partial<Record<string, User>> All the regular users currently loaded for the current DatoCMS project,
indexed by ID. It will always contain the current user. If some users you
need are not present, use the loadUsers function to load them.
All the regular users currently loaded for the current DatoCMS project,
indexed by ID. It will always contain the current user. If some users you
need are not present, use the loadUsers function to load them.
ctx.ssoUsers: Partial<Record<string, SsoUser>> All the SSO users currently loaded for the current DatoCMS project, indexed
by ID. It will always contain the current user. If some users you need are
not present, use the loadSsoUsers function to load them.
All the SSO users currently loaded for the current DatoCMS project, indexed
by ID. It will always contain the current user. If some users you need are
not present, use the loadSsoUsers function to load them.
These methods let you open the standard DatoCMS dialogs needed to interact
with records.
ctx.createNewItem(itemTypeId: string) => Promise<Item | null> Opens a dialog for creating a new record. It returns a promise resolved
with the newly created record or null if the user closes the dialog
without creating anything.
Opens a dialog for creating a new record. It returns a promise resolved
with the newly created record or null if the user closes the dialog
without creating anything.
const itemTypeId =prompt('Please insert a model ID:');
2
3
const item =await ctx.createNewItem(itemTypeId);
4
5
if (item) {
6
ctx.notice(`Success! ${item.id}`);
7
}else{
8
ctx.alert('Closed!');
9
}
ctx.selectItem Opens a dialog for selecting one (or multiple) record(s) from a list of
existing records of type itemTypeId. It returns a promise resolved with
the selected record(s), or null if the user closes the dialog without
choosing any record.
Opens a dialog for selecting one (or multiple) record(s) from a list of
existing records of type itemTypeId. It returns a promise resolved with
the selected record(s), or null if the user closes the dialog without
choosing any record.
ctx.editItem(itemId: string) => Promise<Item | null> Opens a dialog for editing an existing record. It returns a promise
resolved with the edited record, or null if the user closes the dialog
without persisting any change.
Opens a dialog for editing an existing record. It returns a promise
resolved with the edited record, or null if the user closes the dialog
without persisting any change.
const itemId =prompt('Please insert a record ID:');
2
3
const item =await ctx.editItem(itemId);
4
5
if (item) {
6
ctx.notice(`Success! ${item.id}`);
7
}else{
8
ctx.alert('Closed!');
9
}
Load data methods
These methods can be used to asyncronously load additional information your
plugin needs to work.
ctx.loadItemTypeFields(itemTypeId: string) => Promise<Field[]> Loads all the fields for a specific model (or block). Fields will be
returned and will also be available in the the fields property.
Loads all the fields for a specific model (or block). Fields will be
returned and will also be available in the the fields property.
ctx.loadItemTypeFieldsets(itemTypeId: string) => Promise<Fieldset[]> Loads all the fieldsets for a specific model (or block). Fieldsets will be
returned and will also be available in the the fieldsets property.
Loads all the fieldsets for a specific model (or block). Fieldsets will be
returned and will also be available in the the fieldsets property.
ctx.loadFieldsUsingPlugin() => Promise<Field[]> Loads all the fields in the project that are currently using the plugin for
one of its manual field extensions.
Loads all the fields in the project that are currently using the plugin for
one of its manual field extensions.
These methods can be used to update both plugin parameters and manual field
extensions configuration.
ctx.updatePluginParameters(params: Record<string, unknown>) => Promise<void> Updates the plugin parameters.
Always check ctx.currentRole.meta.final_permissions.can_edit_schema
before calling this, as the user might not have the permission to perform
the operation.
Updates the plugin parameters.
Always check ctx.currentRole.meta.final_permissions.can_edit_schema
before calling this, as the user might not have the permission to perform
the operation.
ctx.updateFieldAppearance(...) Performs changes in the appearance of a field. You can install/remove a
manual field extension, or tweak their parameters. If multiple changes are
passed, they will be applied sequencially.
Always check ctx.currentRole.meta.final_permissions.can_edit_schema
before calling this, as the user might not have the permission to perform
the operation.
Performs changes in the appearance of a field. You can install/remove a
manual field extension, or tweak their parameters. If multiple changes are
passed, they will be applied sequencially.
Always check ctx.currentRole.meta.final_permissions.can_edit_schema
before calling this, as the user might not have the permission to perform
the operation.
ctx.notice(`Successfully edited field ${field.attributes.api_key}`);
36
}
Upload dialog methods
These methods let you open the standard DatoCMS dialogs needed to interact
with Media Area assets.
ctx.selectUpload Opens a dialog for selecting one (or multiple) existing asset(s). It
returns a promise resolved with the selected asset(s), or null if the
user closes the dialog without selecting any upload.
Opens a dialog for selecting one (or multiple) existing asset(s). It
returns a promise resolved with the selected asset(s), or null if the
user closes the dialog without selecting any upload.
ctx.editUpload(...) Opens a dialog for editing a Media Area asset. It returns a promise
resolved with:
The updated asset, if the user persists some changes to the asset itself
null, if the user closes the dialog without persisting any change
An asset structure with an additional deleted property set to true, if
the user deletes the asset.
Opens a dialog for editing a Media Area asset. It returns a promise
resolved with:
The updated asset, if the user persists some changes to the asset itself
null, if the user closes the dialog without persisting any change
An asset structure with an additional deleted property set to true, if
the user deletes the asset.
const uploadId =prompt('Please insert an asset ID:');
2
3
const item =await ctx.editUpload(uploadId);
4
5
if (item) {
6
ctx.notice(`Success! ${item.id}`);
7
}else{
8
ctx.alert('Closed!');
9
}
ctx.editUploadMetadata(...) Opens a dialog for editing a "single asset" field structure. It returns a
promise resolved with the updated structure, or null if the user closes
the dialog without persisting any change.
Opens a dialog for editing a "single asset" field structure. It returns a
promise resolved with the updated structure, or null if the user closes
the dialog without persisting any change.