DatoCMS Cache Tags and Next.js
Using Next.js Cache Tags, you can build pages that respond as pre-rendered content, with the ability to invalidate them later, when the data changes. The idea itself is rather powerful, but as it often happens in computer science, the challenge isn't so much with caching but more about knowing when to invalidate that cache. This is where things get tricky.
Fortunately, we have a solution: DatoCMS Cache Tags have been designed to simplify the notoriously difficult problem of caching for developers!
Preamble: How do Next.js cache tags work?
This diagram provides a summary of the essential steps for understanding On-Demand Revalidation in Next.js through cache tags:
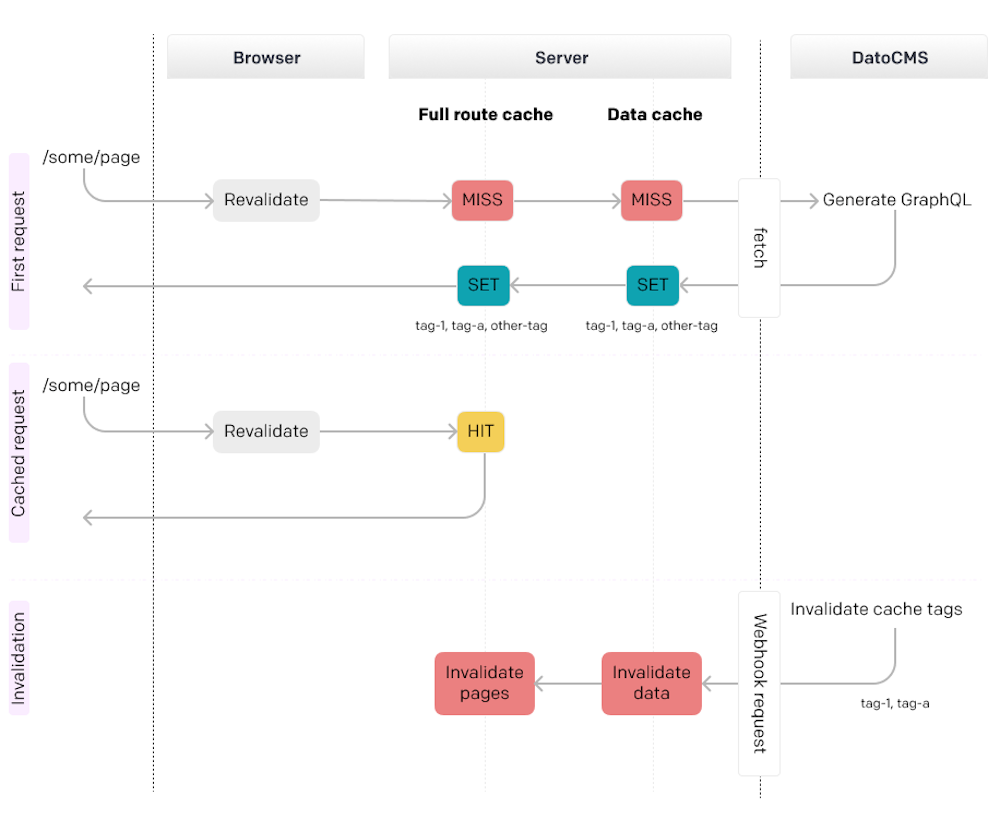
When the browser requests a page, Next.js by default, responds with a Cache-Control: public, max-age=0, must-revalidate header. This tells the browser to always verify from the server if a newer version of the page is available. If there's no change, the server responds with the status 304, therefore saving bandwidth and time. This is referred to as the "revalidate" pattern.
The first time the browser requests a page, both the Full route cache and the Data cache will be empty, resulting in two MISS answers that trigger the fetch() requests contained in your routes. The results of those fetch() calls will be stored and tagged in Next.js Data Cache. After that, the entire page will be stored in the Next.js Full Route Cache, and marked with the same set of cache tags.
Once the cache has been created, Next.js will be able to answer the following requests with the pre-rendered result and no execution of code, until a revalidateTag() is invoked (for instance, due to a route handler connected to a webhook). In this case, the cache will be cleared and the process will restart from the beginning.
How to implement DatoCMS Cache Tags with Next.js
Given that Next.js implements cache tags, and DatoCMS provides cache tags... well, the first strategy that comes to mind is to use the Cache Tags of DatoCMS directly as the next.tags option in the fetch() calls of your own Next.js project, right?
Unfortunately, this is not possible, because Next.js can only associate up to a maximum of 128 tags for each fetch() request, while DatoCMS can return more than 128 tags per query.
To circumvent the problem, there is an alternative solution, which however requires the use of some type of persistent database. Great options are Turso or Vercel Postgres.
The idea
Before we delve into the details, let's focus on the pattern we're aiming for:
Implement a function — i.e.,
executeQuery()— responsible for executing a GraphQL query using the DatoCMS Content Delivery API, and caching the result.To be able to invalidate this request later, the
fetch()needs to tag the request. We'll use a single tag and call it "Query ID", as it will be unique for each query.Before returning the result of the query,
executeQuery()needs to read theX-Cache-Tagsheader in the response, and save the "Query ID to DatoCMS Cache Tags" mappings in the DB.
Implement a route handler listening for "Cache Tag Invalidation" events. The route needs to:
Take from the webhook payload the DatoCMS Cache Tags that need to be invalidated;
Search the DB for all the Query IDs linked to these cache tags;
Use
revalidateTag()to invalidate all the identified Query IDs.
In each route that uses
executeQuery(), set updynamic = 'force-static'as Route Segment Config.
The actual code
We have prepared a Next.js project perfectly configured to integrate with DatoCMS Cache Tags. Every part of the code is thoroughly commented to assist you in understanding.
We recommend starting from the "Useful resources to navigate the code" section of the README for a general overview, and links to the most important parts of the code in the repo.